
Warrumbungle Milky Way Time-Lapse
Warrumbungle National Park is an International Dark Sky Park. In 2016, the park was selected for its low light pollution, low humidity and high altitude, and is currently Australia’s only Dark Sky Park. On a moonless night, it is very dark and perfect for shooting astrophotography. Those were the circumstances a few weeks ago when I was camping in the park. It was also a cold night – around the 2-degree mark.
Let me take you through the preparation and running of the time-lapse shoot.
Location
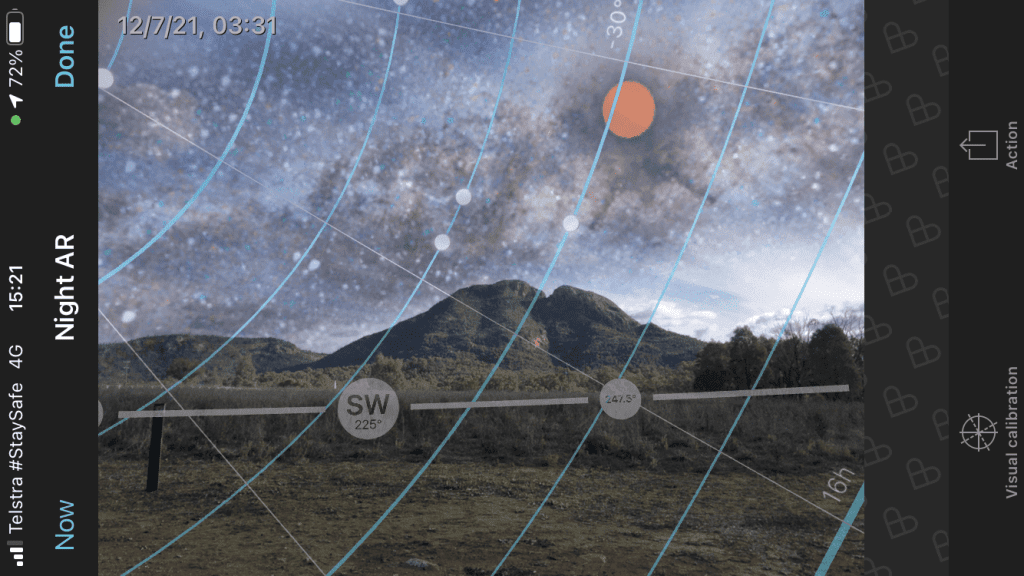
The day before the shoot, I scouted out a good location with a clear view of the famous mountain skyline. I used the Night AR function in the PhotoPills app to figure out how the Milky Way would travel across the night sky. I decided that the best view was to watch it set behind Bluff Mountain.
Below is a screenshot from the PhotoPills app showing the position of the Milky Way at 3:31 am.
It’s all very well to pick a location during the day but nothing beats a test shot in the dark. It was only a short walk to the location, so after dark, I went for a few test shots with very good results.
Duration
The aim was to make a 20-second video. At 25 frames per second, that meant I needed 500 photos. With an exposure time of 15 seconds per photo, it would take around 2 hours and 15 minutes for the shoot. To capture the Milky Way travel across the sky before dawn, I needed to start at 2 am.
Preparation
There is plenty to prepare before a night shoot. Here are some details about the important part.
Power
You have to make sure you have enough power for the camera to run for several hours. If it’s going to be cold, you will run the risk of getting condensation on the lens’s front element, especially since it will face upwards. I use a lens warmer cuff to prevent that from happening. The cuff is powered by the same power bank that will power the camera. The power bank I’m using is 20,000 mAh which will last for 4-5 hours.
Manual Focus
It is important to use manual focus since auto-focus typically fails to find focus in a dark sky. I shot with a Laowa 15mm f2.0 which only has manual focus. I focus the lens on a distant object before I leave and secure it with a piece of gaffer tape to prevent the focus ring from moving. If you have a lens with auto-focus, turn it to manual.
Shutter Speed
To figure out what shutter speed to use without getting star trails, you apply the 500 Rule. Since I have an APS-C sensor with a crop factor of 1.5, I have to consider that when calculating the shutter speed.
Formula: 500 / focal length = shutter speed
For my 15mm lens on an APS-C sensor, the calculation looks like this: 500 / (15 x 1.5) = 22.22. I can use a shutter speed of up to 22 seconds without noticeable star trailing. To further reduce the trailing effect, I set the shutter speed to 15.0 seconds.
This calculation applies to other astrophotography, not just time-lapse, so when you have worked it out once you don’t need to do it for the next shoot.
Other Camera Settings
I always shoot in RAW format to capture the highest quality image and provide most options in the post-processing stage. I don’t use any lens filters when shooting at night. This means that there is one less piece of glass in the path of the light to cause distortion. I turn down the brightness of the monitor on the back of the camera. In the dark, the normal setting will appear way too bright.
Camera settings:
- Shoot Mode: Manual
- Focal Mode: Manual
- Shutter Speed: 15.0 seconds
- Aperture: f2.0
- ISO: 2500
- White Balance: 4000K
- Image Stabilisation: Off
- Long Exposure Noise Reduction: Off
- Image Auto Review: Off
What to bring
A tripod is of course necessary for a night shoot. I bring warm clothes, even for night shoots in summer. It gets cold waiting around for hours. A camping chair comes in handy. A head torch is essential both for finding the selected location in the dark and during the setup. I always have mozzie repellent in the camera bag. I would suggest that you bring something to read and a large amount of patience.
The Shoot
You need to use some type of intervalometer. It can be one built into the camera or an external device. While I have an external intervalometer, I use the one I’ve installed on my Sony a6500. My external intervalometer is a cheap version and has some flaws. An LRTimelapse PRO Timer 3 is on the shopping list since it is a more advanced intervalometer. For a 15 second exposure time, I set the interval to 16 seconds, giving the camera 1 second to process and write the image to the card before taking another shot. If you want to use the auto review function on the camera, you will need to make the interval longer, say 5 seconds. Since I’m not doing a night-to-day transition, I have no need to review the photos during the shoot. No need to make the night shoot longer than necessary. Finally, I don’t set the exposure counter but leave it unlimited and then stop the process manually. That way you can extend the shoot in case something exciting happens at the end – a meteor shower perhaps.
A time-lapse shoot at night will typically take several hours. Should I leave the camera, go to bed and hope that no one steals it? Stay and watch? Well, I’ve done both. It all depends on the environment and how long you are shooting for. On this occasion, I stayed.
If you decide to stay and watch, don’t kick the tripod – one of the most common mistakes in time-lapse photography.
The final result from this shoot was 600 photos over 2 hours and 45 minutes and a very cold photographer.
Post-processing
The post-processing often takes longer than the shoot. I use LRTimelapse and Lightroom to make adjustments and generate the final video. LRTimelapse integrates with Lightroom and allows me to edit a small set of images, called keyframes, in the very large total set. For this video, I chose three keyframes. This means that I edit three images instead of 600. The adjustments of the keyframes are then distributed across all images in the set in LRTimelapse. The final step is to render the video. LRTimelapse has a large number of options that can be applied to control quality, speed and layout. The video shown here was generated at 3K resolution to reduce the file size for display on the website until I get a more elegant video sharing solution.
Below is the result of the shoot – a 24-second video.
A print from the shoot is available in the shop: Warrumbungle Nightsky
Hope you’ve enjoyed reading this journal and feel free to leave a comment.
You might also like


4 Comments
Brilliant, thanks for sharing your technique and video, very much appreciated. When all this Covid stuff is finished we intend to go to the Warrumbungles in our camper-trailer. Could you advise the best time of year to visit the Bungles with the Milky Way. Regards, Norman.
Hi Norman
Thanks for your comments.
In general terms, the best time to see the Milky Way in Australia is from late February to late October. That is when you can see the Galactic Centre in the night sky.
As the year progresses, the Milky Way is visible in different locations of the sky and different elevations. For instance, on 1 April at 2 am the Milky Way sits horizontally high in the sky, 15 June at 2 am it is vertical on the western side of the south celestial pole and 1 September at the same time, it sits along the horizon. The celestial pole is the imaginary point in the sky that the earth rotates around. That means that at 2 am in September, the Milky Way would almost be behind that mountain ridge in the park.
I would go back again in June/July. The nights are long and you will have plenty of choices in regards to the placement of the Milky Way in your photo. The Milky Way is visible from 7 pm to 5.30 am.
To give you an idea of the placement in the sky, the images used for the time-lapse were shot on 12 July from 2.13 am to 4.59 am.
I highly recommend the PhotoPills app. The Planner function allows you to set any date and then use the Night Augmented Reality function to see the placement of the Milky Way.
Another great resource is the Milky Way Calendar published by Capture the Atlas. It has the rise and set times for the Milky Way, moon and sun.
I’m looking forward to seeing your photos.
Regards
Ola
References
PhotoPills: https://www.photopills.com/
Capture the Atlas: https://capturetheatlas.com/milky-way-calendars/
Thanks Ola, really appreciate your feedback and advice. I will invest in the PhotoPills app. Regards, Norman.
[…] The photograph, Warrumbungle Nightsky, was taken at 3 o’clock on a cold night in July 2021. It was part of a 600-image series for Milky Way time-lapse. You can see it here. […]